
Starting with angular
Angular versions
- AngularJS (Angular 1) - This is the initial version.
- Angular2 - it’s a complete rewrite to fix Angular1 problems, since then versioning has changed and it now there’s angular 12 relased on May 12, 2021
Installing Angular
- Download the current LTS version of angular in https://nodejs.org/en/download/ Note. it’s easier if you install the MSI version, so you don’t have to setup PATHS manually for the node or npm commands.
- Install the latest version of Angular using the following command
npm install -g @angular/cli@latestCreate a new project
To create a new project, we need to type from the command prompt. Note. The project name cannot have any spaces or the word “test”
ng new <project name> --no-strict–no-strict flag is used to disable some optimizations along with best practices validation. This is to make our life easier in the begining of our development.
Start test server
After we have created our project, we can start a local server for development with the command below. This command will help us compile our code and push it to a local server where we can see our current changes. By default you can see your changes at: http://localhost:4200/
cd my-first-app
ng serve
Default project structure
- your-app
- angular.json Defines angular build defaults
- src
- index.html default initial page UI.
- main.ts This is the first code that gets executed.
- app
- app.component.html Initial component UI.
- app.component.ts Main and default component code
- app.module.ts Main modules definition.
app.component.ts
This is the defintion of a module, which will allows us to use it later.
selector allows us to define the name that we’ll use to “insert” our module. Selectors are very similar to CSS selectors, but you can only use tags, attributes or class elements.
For example:
import { Component } from "@angular/core";

@Component({
    selector: 'app-server', // Selector name
    templateUrl: './server.component.html'
})
export class ServerComponent {

}
We can use the component above with the following tag.
<app-server></app-server>app.module.ts
Here you can add new modules to the application.
import { NgModule } from '@angular/core';
import { FormsModule } from '@angular/forms';
import { BrowserModule } from '@angular/platform-browser';
import { AppComponent } from './app.component';
//New module with relative path
import { ServerComponent } from './server/server.component';

@NgModule({
  declarations: [
    AppComponent,
    ServerComponent //New module declaration
  ],
  imports: [
    BrowserModule,
    FormsModule
  ],
  providers: [],
  bootstrap: [AppComponent]
})
export class AppModule { }
angular.json
This is the main configuration file and it defines defaults for:
- styles (css)
- build
- development tools (e.g. cli, schematics, architect)
- libraries
Note. Paths are relative to the root folder of the workspace
Add a new component
The command *ng generate component
PS C:\Users\Pablo\Documents\GitHub\training\my-first-app> ng generate component testa
CREATE src/app/testa/testa.component.html (20 bytes)
CREATE src/app/testa/testa.component.spec.ts (619 bytes)
CREATE src/app/testa/testa.component.ts (271 bytes)
CREATE src/app/testa/testa.component.css (0 bytes)
UPDATE src/app/app.module.ts (643 bytes)
4 files will be created
- html for UI
- spec.ts Unit test
- ts our typescript code/logic
- css component styling
it’ll also update app.module.ts for our application to use the component.
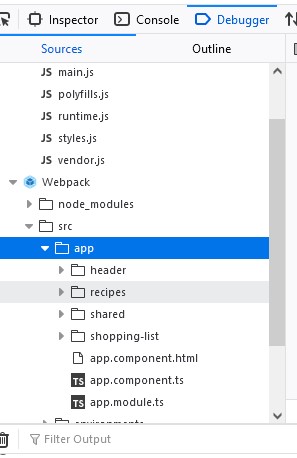
Debugging
The output of angular is javascript, however the actual output is not exactly the same as our code. Templates and typescript code will be merged together and we won’t be able to easily see it.
But there’s a way to see the actual code when you are working on it, and that is the webpack. This is a new section in your javascript debugger that shows the actual code you developer. This only works when the code is deployed in development mode.
View encapsulation
This is how angular components get separate styles and they are independent of each other, and by default it uses an emulated view encapsulation.
To control how this encapsulation happens on a per component basis, set the view encapsulation mode in the component metadata
There are 3 types:
- ShadowDom view encapsulation uses the browser’s built-in shadow DOM implementation.
- Emulated view encapsulation (the default) emulates the behavior of shadow DOM by preprocessing (and renaming) the CSS code to effectively scope the CSS to the component’s view.
- None means that Angular does no view encapsulation. Angular adds the CSS to the global styles. The scoping rules, isolations, and protections discussed earlier don’t apply. This mode is essentially the same as pasting the component’s styles into the HTML.
This behavior can be changed for each component by using the encapsulation option.
@Component({
  selector: 'app-no-encapsulation',
  template: `
    <h2>None</h2>
    <div class="none-message">No encapsulation</div>
  `,
  styles: ['h2, .none-message { color: red; }'],
  encapsulation: ViewEncapsulation.None,//Select your encapsulation
})Component lifecycle
Componentes have hooks (methods) that are called at certain points during the life of a component. These are used in some special ocasions or in scenarios where regular events are not enough.
- ngOnChanges() Respond when Angular sets or resets data-bound input properties.
- ngOnInit() Initialize the directive or component after Angular first displays the data-bound properties and sets the directive or component’s input properties
- ngDoCheck() Detect and act upon changes that Angular can’t or won’t detect on its own.
- ngAfterContentInit() Respond after Angular projects external content into the component’s view, or into the view that a directive is in.
- ngAfterContentChecked() Respond after Angular checks the content projected into the directive or component.
- ngAfterViewInit() Respond after Angular initializes the component’s views and child views, or the view that contains the directive
- ngAfterViewChecked() Respond after Angular checks the component’s views and child views, or the view that contains the directive.
- ngOnDestroy() Cleanup just before Angular destroys the directive or component.